Hosting Your Own Memories with Immich
Published:
Around the time from 2015 to 2020, I was used to using Google Photos, and I was a fan of having an external storage that you can sync your device with and not worry about the storage. However, I slowly realize this is not going to be a scalable solution, speciailly if you have multiple devices and the quality of these captured images and videos becomes increasingly higher. Then I started looking at self-storage solutions that can be scaled well in the future while also being power-efficient, with enough redundancy, and accessible anywhere.
Background
During that time, my good friend and co-worked Daniel Volya mentioned about the Tailscale to me. So that we can solve the accessibility issue, my next objective is to find a reliable tool that works all the time. One day, I came across Immich, and I was impressed. Although during that time Immich was going through the initial development and having frequent breaking changes. Then Immich also released their mobile app that supports iOS and Android.
Now that I figured out the tools, I wanted to build my own NAS servers. By the way, during this time, storage was cheap compared to now. So I wanted to start with a simple server that can be powered using Type-C 5V with a plan of building a larger mechanical HDD version later. In this episode, I am documenting the build log of these two machines.
Environment



Docker is what I used to keep services isolated and easy to update or rollback without reinstalling the whole system. Raid is there because disks will fail eventually, so I wanted redundancy and less chance of losing everything the day a drive decides to die. Immich is the actual photo/video stack that made this whole thing feel like a proper replacement for Google Photos, including the mobile workflow. Samba is for the boring but necessary file access, so I can still use the NAS like a normal network drive when I need to move things around. Tailscale solves the “accessibility anywhere” part because I didn’t want to deal with exposing ports or weird networking just to reach my own storage remotely.
Small CM4 NAS (codenamed ArchNAS.v1)
When I was going through the options, I came across this compact, full-metal NAS board from Waveshare. It looks very nice, supports CM4 (they were cheap back then), and supports 2x2.5” mobile HDDs with a SATA interface.
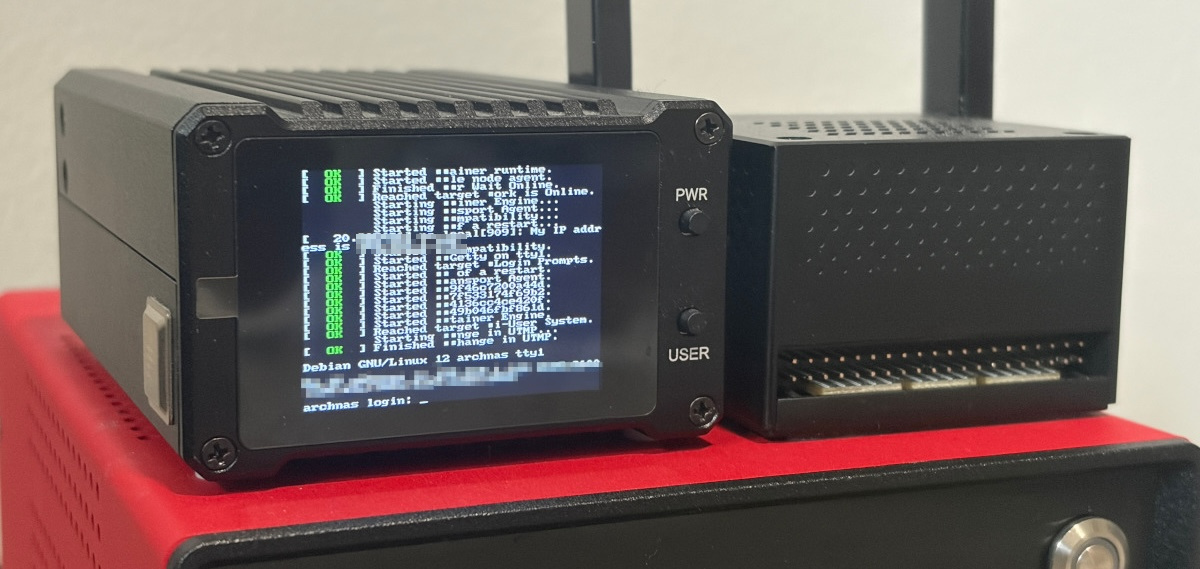
Slightly modified Waveshare NAS running a modified CM4.
However, there were a couple of problems with this Waveshare design. There was an intermittant SATA initiailization issue caused by the Switch ASM1184 during the device boot process that prevented the system from booting, triggering a kernel panic. This was the most annoying one because when storage is flaky, it defeats the whole point of having a NAS you can trust. Thermals were also not great, since the board is compact and metal and everything is packed tightly, so you end up having to think about cooling way more than you’d expect. And since this board is designed for the CM4, it did not work with RADXA CM5, which became a limitation later when I wanted to change the compute module and keep the rest of the setup. I was able to fix the thermal issue by using a larger internal heatsink and connecting it direclty to the alumunium housing using a couple of thermal pads.
After testing this setup for a while, I wanted a bit more scalable and cheaper solution in the long term, and that is when I decided to make a NAS that supports 3.5” HDDs.
Big CM5 NAS (codenamed ArchNAS.v2)
This is where I wanted to go more “real NAS” style with proper 3.5” drives and a setup that I can keep expanding over time without redoing everything from scratch. I used the CM5 Career (from Geekworm) because it already has a PCIE splitter that devides the PCIE in to two, which made it much easier to attach more storage without immediately hitting a wall. The compute module itself (CM5 16GB 32GB) is basically the brain here, and I wanted enough RAM to keep things smooth when multiple services are running and when Immich indexing/import jobs are going on. Once you start moving to multiple 3.5” drives, cables and power distribution stop being “an afterthought”, so SATA extensions become part of the build. The SATA SWITCH (NVME to 5xSATA with the JMB585) is what makes the build feel scalable instead of being stuck with just one or two drives. With more drives and a real PSU, I also wanted proper control instead of just hard power on and off manually, and that’s where the custom PSU controller comes in. And finally, I didn’t want to rely on random small adapters once I crossed into “multiple HDDs” territory, so a proper server PSU made more sense for stability.
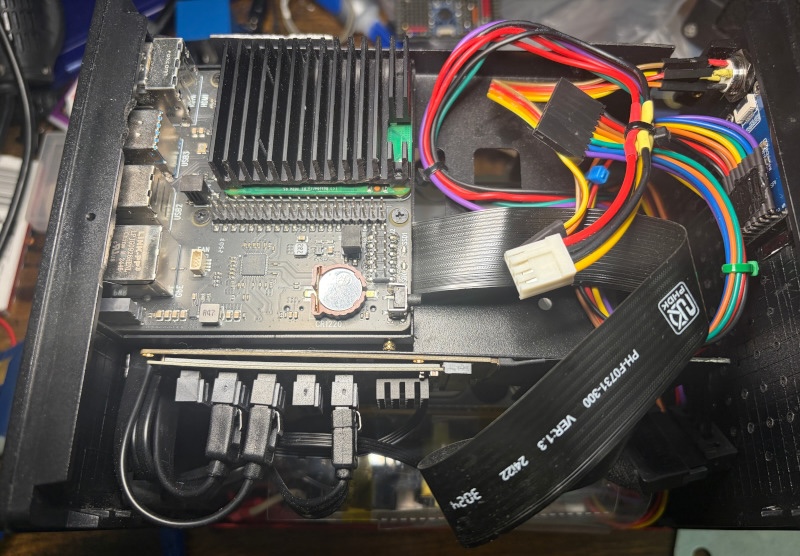
Everything assembled into a standalone steel enclosure
PSU Controller
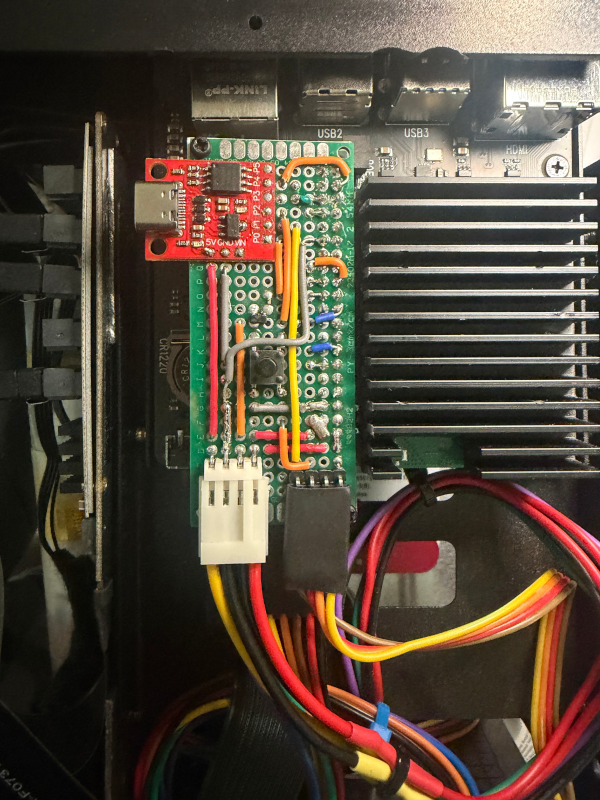 Since this is a larger-scale server that will host multiple 3.5 HDDs, I decided to go with a used Topower 200W 24 Pin ATX Server Power Supply (model number
 TOP-200SM). I wanted a controller to manipulate the PSU with automatic shutdowns. In order to achieve this, I created the psuctl🔌 using an ATtiny85 MCU, which you can read about it from here.
Adding a Tiny Framebuffer Display
Similar to the ArchNAS.v1, I wanted to include a small framebuffer display in this build as well. For this, I used a tiny 1.47-inch Waveshare display. After adding an SPI passthrough for the display on the psuctl🔌 PCB with proper pins, I updated the Raspberry Pi configuration so the panel is initialized at boot and works as a framebuffer console.
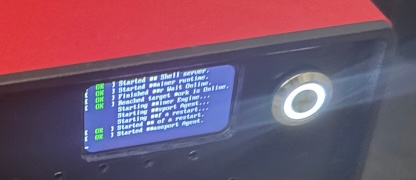 First, I modified the kernel command-line config at
 /boot/firmware/cmdline.txt to make the Linux console show up on the tiny TFT instead of (or alongside) the default output. This is useful because it gives you a local “always-on” status screen during boot and troubleshooting, even if you don’t have HDMI plugged in. I also chose a small VGA font so the text stays readable on a 1.47-inch panel.
fbcon=map:10 fbcon=font:VGA6x8
Then I added the panel driver and wiring details to /boot/firmware/config.txt using a device-tree overlay. This tells the Pi which SPI display controller it is (ST7789V), how it’s wired (reset/DC/backlight pins), and how to render it correctly (rotation, width, SPI speed). Without this, the kernel wouldn’t know how to initialize the display at boot.
dtoverlay=fbtft,spi0-0,st7789v,reset_pin=27,dc_pin=25,led_pin=18,rotate=90,width=206,speed=40000000
Soft RAID
If you have two identical drives (same size, ideally same model), software RAID is one of the simplest ways to add redundancy without buying a dedicated RAID card. For both ArchNAS.v1 and ArchNAS.v2, I manually configured software RAID. If you are not comfortable with linux commands you can always use tools like openmediavault. However, I like the simplicity and transparency of doing it manually: I know exactly what is running, what got changed, and how to debug it later when something goes wrong (because eventually something always does). The idea is pretty straightforward: instead of treating /dev/sda and /dev/sdb as separate disks, Linux combines them into a single virtual device (for example /dev/md0). In RAID1 (mirror), every write is duplicated to both drives, so if one disk fails you can usually keep running on the other one and replace the failed drive later without losing your data.
To create a RAID1 array using mdadm, I used the two drives directly and created /dev/md0 like this:
sudo mdadm --create /dev/md0 /dev/sda /dev/sdb --level=1 --raid-devices=2
After that, it’s important to verify that the array is actually building and healthy. mdstat gives a quick overview of rebuild progress and current RAID status:
cat /proc/mdstat
If any of your drives support SATA III (6 Gbps), there’s a good chance that during the initial RAID sync (heavy sustained reads/writes), the SATA chain can become unstable and one or more links may stop responding. When that happens,
dmesgusually shows timeouts and repeated link resets, something like:
ata2.00: failed command: READ FPDMA QUEUED
ata3.00: failed command: WRITE FPDMA QUEUED
...
Emask 0x4 (timeout)
...
ata2: hard resetting link
ata3: hard resetting link
...
softreset failed (1st FIS failed)
...
ata2.00: disable device
ata3.00: disable device
In my case, this wasn’t the drives themselves but the chain of adapters/bridges used to connect them. A practical workaround is to force the whole stack to negotiate at SATA II speeds (3 Gbps), which is often much more tolerant of marginal cables and adapters. To do that, append
libata.force=3.0to the end of the existing line in/boot/firmware/cmdline.txt.
Depending on the state of the disks and the array, you may also want to ensure the array is writable:
sudo mdadm --readwrite /dev/md0
During the initial sync/rebuild, Linux will throttle RAID speed to avoid killing system responsiveness. These two values show the minimum and maximum rebuild speeds the kernel is allowed to use, which can explain why the first sync sometimes feels slow:
cat /proc/sys/dev/raid/speed_limit_min
cat /proc/sys/dev/raid/speed_limit_max
Once /dev/md0 is ready, you mount it like any other block device. I mounted mine to /mnt/raid:
sudo mount /dev/md0 /mnt/raid
For automounting at startup, the important part is to mount by UUID (not by /dev/md0), because device names can change across boots depending on what the kernel detects first. To find the UUID you can check:
ls -al /dev/disk/by-uuid/
After you have the UUID, you can add an /etc/fstab entry pointing that UUID to /mnt/raid so it comes up automatically on boot.
Conclusion
Looking back, the whole journey started from a very simple goal: keep my photos and videos safe, accessible, and not tied to a single provider forever. Google Photos was convenient, but once the library grows and you have multiple devices pushing higher-quality media, the “just sync it and forget it” model starts to feel less sustainable. Tailscale solved the access part, Immich solved the experience part, and the NAS builds solved the storage part. ArchNAS.v1 was a nice, compact first attempt, and it proved the workflow, but it also showed the real-world limitations around SATA reliability, thermals, and hardware flexibility. ArchNAS.v2 is the step toward something that can actually grow with me over time: more drives, better power, better control, and a setup that feels closer to a long-term home for everything.